QDX Digital Transceiver
I have blogged before, just down a bit, about the remarkable QRP Labs design for a digital transceiver for 80-40-30 & 20m. This design is a conventional SDR receiver, including digital sythesised frequency control, IQ audio to digital I2S codec, software filtering & decoding of USB signals and finally a "sound card" USB interface to your PC or Mac. [more below]
It is the transmit side which is very innovative. The digital USB audio from your PC has it's frequency measured, very fast and very accurately, this digital timing then sets the output frequency square wave of the synthesiser. The resulting RF frequency is amplified digitally and in a class "D" output amplifier. Giving an output of up to 5W across HF bands.
Also included is a CAT serial port implemented on the same USB socket, so your PC sees two ports, audio in/out and serial in/out. These can be directly selected in WSJT-X for FT8, WSPR or other digital modes.
My kit has arrived
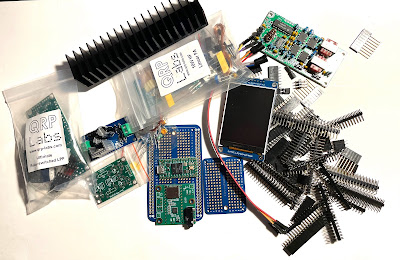
QRP Labs were very kind to put me on the early release shipment list for the next batch of QDX kits and mine arrived yesterday. This is it
QDX kit, that I have started to build.
It is sooo small. Fits in the palm of your hand
The build
1. I read the documentation twice. Very detailed very clear. Seems most of the build is winding toroids. Anyway I have started as instructed to mount the very small capacitors. And I have had a lot of difficulty reading the tiny values printed on them. I mounted 7 and have now taken a break.
2. Finally finished the caps, by a process of elimination as I simply could not read the writing on final value. Hope OK...
3. Moved on and mounted the RFCs & diodes - one diode was cracked at the end where the wire comes out I hope it performs OK. I then mounted the PA transistors and bolted them down, easy.
4. Now the coils. I have wound a few toroids in my time, but I hate it and feel like a novice every time I start. I have chosen the 12V operating power supply so wound the PA transformer 3:2. And I lost count so many times when winding the 19-30-36-41 turn input BPF inductor. But finally arrived here:
First components fitted and
started on the coils
5. So on with more and more toroids. I do wonder if QRP Labs could find a source of pre-wound toroids as this is the most tedious part of the kit construction. But then may be it would be too simple. Seven toroids to go... six for the transmit LPFs 80-40-30/20m and one for the balanced RF input
6. At last got all those pesky LPF coils wound and fitted. I am always scared at this point that I have got bad soldered joints and/or wrong number of turns on the coils.
LPF coils mounted, did I get the turns right?
7. Seems very little 0.33mm wire left for the last transformer T2. Just starting measuring it now. Well I did not by a long way have enough 0.33mm (AWG 28) wire left, 3 x 20cm... so I had to use some 0.28mm (AWG 32) which I had in my components draw. What a faf to twist these three wires, then wind 10 turns, then a faf to identify the correct connections. At last to insert them, finally to solder them. They are very very close tother components so great care is needed. But I must praise the documentation for its calm and clear instructions, without which I would have gone mad.
8. And now to finish up. USB, 12V power and Antenna sockets mounted. Finished. And here it is
I am proud of myself. A neat tiny 5W transceiver!
9. Now to try it out. Think I will box it first as this is easy and straightforward, and I can easily unmount it if anything is wrong, So I did
Boxed QDX, case ground connection not shown
here (see comment below)
Testing
First let's get it connected. Plug in the antenna (an AL-705 loop and Mat-125 ATU). Whoops, the op manual says, "DCPower: use a regulated well- smoothed DC supply of not more than 12V". My shack is all running on a 13.8V supply but I think I have a home grown 12V supply somewhere in a dark pullout draw, I look it out. Yes, here it is, check the voltage, OK 11.8V. Last use this fancy new, posh, white USB B to USB C cable that I bought for the purpose to connect the QDX to my MacBook Air.
Software - MacOS
No drivers to install as the Mac has drivers for all main uses, digital audio and serial comms included. I have the latest version of WSJT-X installed which I normally use for FT8 with my ELAD FDM-DUO transceiver.
WSJT-X - preferences
1. Radio setup: I chose Kenwood TS-480 for the correct CAT commands and the QDX serial port (mine was called "/dev/tty.USBmodem101") should be set at at 8-1-N, the baud rate can be left at 9600 as the USB virtual port does not need this to be set to a particular value. PTT should be set to use CAT commands.
2. Audio setup: For input and output I chose the "QDX Transceiver"
I set the WSJT-X PWR slider to max as the QDX converts any input to square waves and the output is not dependant on the audio input level, only the power supply of 12V to the switching Class D PA.
Now the big moment, connect the 12V supply. Docs say the front red LED will
1. Quick flash for 5 sec on power up. Then go steady red and be in receive mode.
2. When in receive mode, steady red, for one second or
a) 3 quick flashes - transmit mode,
b) 2 quick flashes - computer sending audio to QDX but volume too low to detect
c) 1 quick flash - PTT activated but no audio detected.
Now to operate. I have RF output on 20 & 30m, but none on 40m. Oh. So I guess I have a poor connection somewhere in the 40m LPF, or may be it is that broken 1N4007 "pin"diode I found during construction... have to look into this.
Later: fixed the problem, poor soldered joints on LPF coils. Great care must be taken to burn off the coating on the wire used to wind them, do as docs say, hold your iron on for the full 10 sec!
I chose first 30m as I often use this band. I connect an antenna and my auto ATU, I hit WSJT-X "Tune" to tune the ATU (<1.5 SWR indicated), then switch back to receive and FT8 signals magically appear. First contact!
First contact
Round up
Whoopee. By the way I get 3-4W output 20-80m, not a full 5W. I also noticed that the case QRP Labs supply is not connected to Ground of the circuits! I have screwed a small solder tab on the inside back panel and wired this to the ground side of the 12V connector.
So what is this QDX wonder?
It is an example, very well conceived, of the transformation of amateur radio to the digital world. So little of this transceiver is analog. At the front end there are BPFs which are digitally switched (no relays here). After that a base band detector, where the incoming sideband signals are shifted, or mixed, down to I & Q audio frequencies (actually 12kHz away from zero to allow the digital decoding to happen at an audio of 12-15kHz providing better signal filtering). And then we go to digital audio, with a high end analog/digital sound convertor, the output of which is standard PCM stereo audio signals along a standard I2S bus to the heart of the system, a microcomputer and DSP.
Microcomputer
The microcomputer handles a lot of things. It DSP filters and decodes the I & Q audio I2S inputs to mix them down to cancel one sideband and output Upper Side Band signals. It generates USB output digital audio signals to send to your PC, where applications such as WSJT-X decodes the spectrum and interpret the received audio tones of FT8 or other "digital" modes. So far so good, and fairly conventional as SDR receivers go. But innovative to use a dedicated software in a microcomputer to do this.
Transmit
The heart of the QDX innovation lies in the transmit chain. Applications such as WSJT generate audio tones, for example for FT8 a series of pulses of audio frequencies over a 15sec or so time to encode data in FSK. And these are sent out by your PC over the USB connection as digital audio. It is what the QDX does with these signals that is innovative. The incoming audio to the microcomputer is a digitised sine wave, and the period of this is accurately measured. This then gives the frequency of the tone.
But what we need is to transmit a Upper Side Band RF signal with this audio as modulation, in other word translate the audio back up to RF. This is done in the QDX by an Si5351 digital signal generator capable of generating RF square wave outputs up to 200MHz from any of its 3 outputs. If we chose to be on, say, the 40m band then this synthesiser will be programmed to output the FT8 frequency of 7074kHz plus the instantaneous audio tone frequency we have detected. Thus generating an FSK transmission, with no suppressed carrier and no wrong sidebands at all.
The huge advantage of this digitalisation, rather than analog mixing, is that two of the Si5351 outputs can be programmed to output the digital signals 0/180deg out of phase. Why? Because these can be used to drive a push-pull power amplifier stage in class D operation. This has very high efficiency and thus very low heat dissipation. The PA generates 5W of RF from four small TO92 MOSFET transistors mounted on the PCB which is sufficient to provide a heat sink! Of course square waves have harmonic content, though by using push-pull amplifiers there is little 2nd harmonic and the first one to filter out is the 3rd at a much higher frequency. So conventional 5 element Low Pass Filters are all that is needed to meet legal harmonic output levels, and in practice much better.
But what about changing bands? As we have seen on the receive input digital CMOS switches change to different BPFs, and here again on the output RF side the switching of the LPFs is done digitally by "pin diodes" under control of the microcomputer.
Lastly, CAT
The final task of the microcomputer is to provide a digital serial USB port which uses the same cable connection as the audio, to provide CAT control. The program emulates the Kenwood TS440 or 480 transceiver - using ASCII text strings for communication - a much better solution than the complex ICOM hex data coding...
Thus applications such as WSJT-X can set the band and provide CAT transmit/receive PTT control. And there is but a single USB cable from transceiver to PC carrying both digital audio and serial data.
Wonderful
Thus we have an almost entirely digital transceiver which fits in an incredibly small box that you can hold in the palm of your hand. The receive chain has an option to be used as a simple IQ audio detector and have the microcomputer send these IQ signals directly to your PC, where applications such as Cubic SDR or HDSDR on a PC can be used to display a spectrum and waterfall of the received signals. But of course it cannot transmit analog speech SSB as it is only a digital transmit system.


