Starting 8 Sept, the Banbury Amateur Radio Society is running a course we call Concept.

The goal is to bring members up to speed with the Arduino and software programming, and then to build Digital VFO and SDR shields to make a stack of a complete radio receiver. There are 7 sessions overall to complete the program. In the future we may continue to develop TX, PA and LPF shields.
Here are the main slides used for Session 1, given by M6KWH, and the complete code of the software used.
CONCEPT

Kits have been prepared for people attending the course:


THE ARDUINO

DOWNLOAD
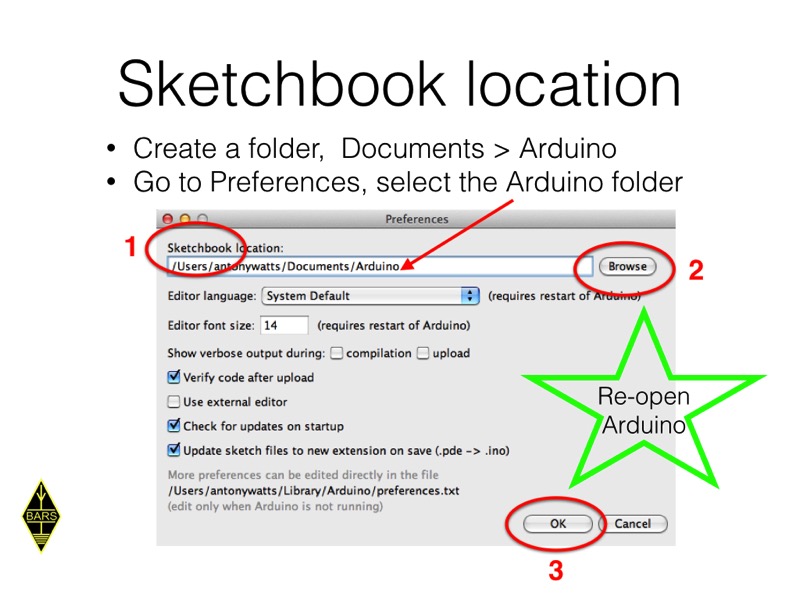
Your PC must be loaded with the IDE from Arduino.cc web site.

LOCAL FILES
A bunch of local files - programs and libraries - are installed on the PC. These are handed out during the session on a USB stick. If you are following this course on-line you will get the source code of sketches published here, but you will have to Google the libraries you need an install them yourself.
A BASIC SKETCH
All Arduino program sketches have a basic structure like this:

LEARNER SKETCHES
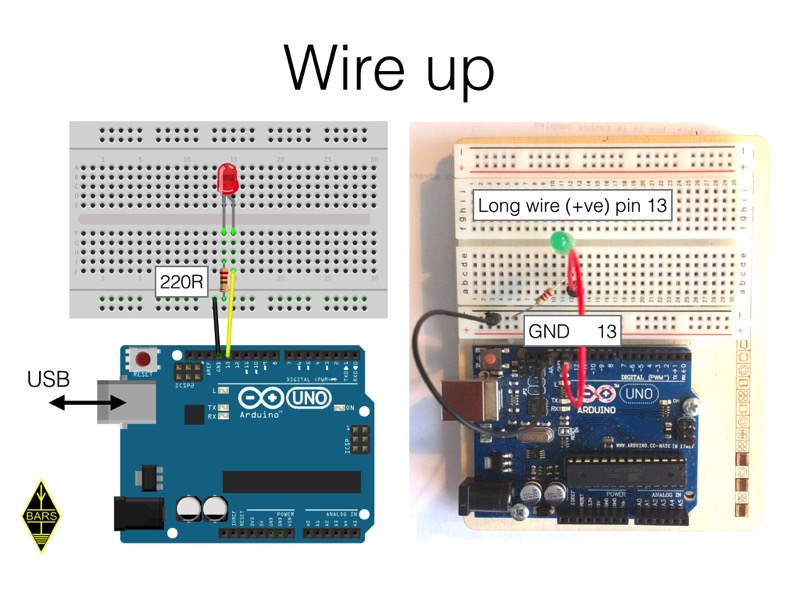
We will build two simple circuits to interface with the Arduino and run sketches for them. They are the famous starter sketch "Flash an LED" and an Amateur Radio sketch for generating Morse Code.
CODE
// My_Blink
// flashes a LED on pin 13
// pin number
#define LED 13
// the setup routine runs once when you upload (->) the sketch
void setup() {
// initialise the digital pin 13 as an output
pinMode(LED, OUTPUT);
}
// the loop runs over and over again, forever
void loop() {
digitalWrite(LED, HIGH); // turn the LED on (HIGH voltage level)
delay(1000); // wait for 1 second (1000ms)
digitalWrite(LED, LOW); // turn the LED off (LOW voltage leve)
delay(1000); // wait for 1 second
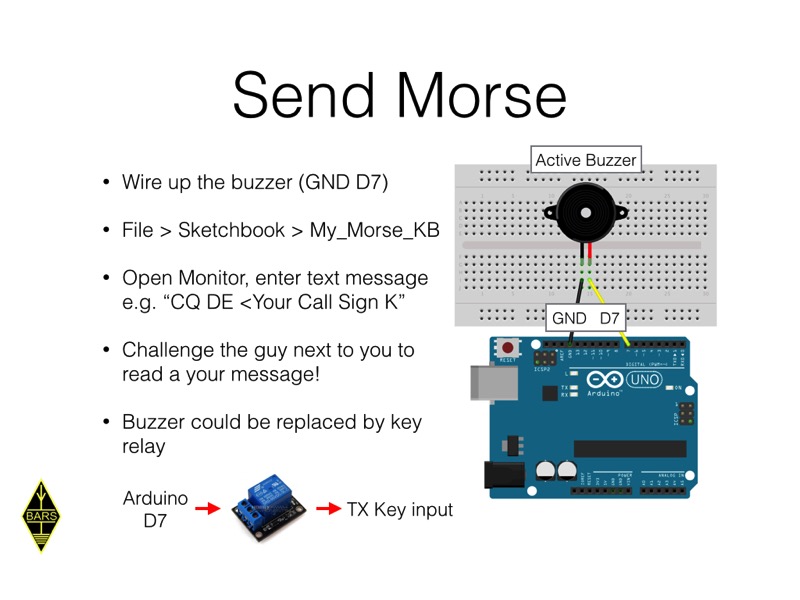
}The second sketch buzzes morse code.
CODE
// My_Morse_KB is a morse morse sender with KB input
// active piezo buzzer on pin 7

// include the special llibrary to generate morse dit/dah
#include "MorseEnDecoder.h"

// define a constant for words per minute
#define WPM 5

// define a constant for the buzzer pin
#define BUZZER 7

// create a morseOut object
morseEncoder morseOut(BUZZER);

// setup runs once on upload
void setup() {
  // set BUZZER pin as an output
  pinMode(BUZZER, OUTPUT);

  // start serial comms with Arduino IDE monitor window, over USB
  Serial.begin(9600);
  while (!Serial); // wait for USB connection

  // call morseOUT object to set the morse speed
  morseOut.setspeed(WPM);
}

// loop repeats over and over
void loop() {
  // char variable to hold a character of input
  char text;

  // set morseOut encode mode
  morseOut.encode();

  // if characters in the input buffer & morse object available
  if (Serial.available() && morseOut.available()) {
    text = Serial.read(); // read a character
    Serial.write(text); // echo it
    morseOut.write(text); // send out as morse
  }
}
Before moving on make sure you understand the code, it will always get more complex!!!

