Thursday 13 March 2014

Playing with FFT

I have worked super hard to try to get an FFT going. With somewhat disappointing results? I have looked at a number of FFT code libraries for the Arduino. but found only one that is implementable on the Uno (8bit code). This is "fix_fft". Here's my setup (with a 1kHz sinewave input), the audio lines are the Yellow (GND) and Green (SIGNAL at 0dB)

2014 03 14 10 26 08

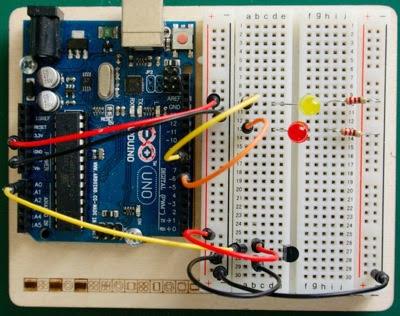
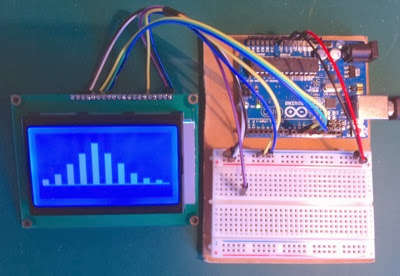
The audio input to the Arduino is on A0, with bias at the mid point by 10K to GND and 10K to +5V. In this example shown here the input is a sine wave of 1kHz from the program Signal Inspector running on my iMac. The full range of the code displays a maximum up to about 4kHz.

Hint: Google "u8glib" and "fix_fft", then put them both in your Arduino "libraries" folder.

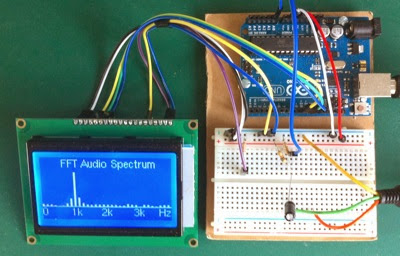
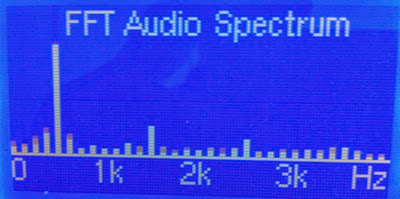
Here's a photo of the display with a 500Hz square wave input. You can see the fundamental and the harmonics at x3, x5 & x7.

2014 03 14 15 45 53

Code

#include "U8glib.h"
#include "fix_fft.h"


// LCD SPI SCK-EN, MOSI-RW & SS-CS
#define EN 13
#define RW 11
#define CS 10

// display set up, bar, line position L & R
#define LINEY 50
#define LINEXL 0
#define LINEXR 128

#define SAMPLES 128

#define AUDIO A0

U8GLIB_ST7920_128X64_1X lcd(EN, RW, CS); // serial use, PSB = GND

char im[SAMPLES];
char data[SAMPLES];
int barht[SAMPLES];

void setup()
{
  lcd.begin(); // inti display
  lcd.setRot180(); // flip screen
}

void loop()
{
  static int i, j;
  int val;
  

  // get audio data
  for(i = 0; i < SAMPLES; i++)
  {
    val = analogRead(AUDIO); // 0-1023
    data[i] = (char)(val/4 - 128); // store as char
    im[i] = 0; // init all as 0
  }


  // run FFT
  fix_fft(data, im, 7, 0);

  // extract absolute value of data only, for 64 results
  for(i = 0; i < SAMPLES/2; i++)
  {
    barht[i] = (int)sqrt(data[i] * data[i] + im[i] * im[i]);
  }
  
  for(i = 0, j = 0; i < SAMPLES/2; i++, j += 2)
  {
    barht[i] = barht[j] + barht[j + 1];
  }
  
  // display barchart
  barchart(SAMPLES/4, barht); // plot SAMPLES / 4 = 32 as barchart gen cannot handle 128 bars
} 

// plot line and bar at position and height
void barchart(int n, int bh[])
{
  int i, s, w; // bars, spacing and width
  
  s = (LINEXR - LINEXL) / n;
  w = s / 2;
  
  lcd.firstPage();
  do
  {
    lcd.setFont(u8g_font_helvR08);
    lcd.drawStr(20, 10, "FFT Audio Spectrum");
    lcd.drawLine(LINEXL, LINEY, LINEXR, LINEY);
    lcd.drawStr(0, LINEY + 10, "0");
    lcd.drawStr(29, LINEY + 10, "1k");
    lcd.drawStr(59, LINEY + 10, "2k");
    lcd.drawStr(91, LINEY + 10, "3k");
    lcd.drawStr(115, LINEY + 10, "Hz");
    
    for(i = 0; i < n; i++)
    {
      lcd.drawBox(LINEXL + s * i, LINEY - bh[i], w, bh[i] + 1); // u8glib doesn't accept box height of 0
    }
      
  }while(lcd.nextPage()); 
}


Improvements can be made by directly programming the Arduino Uno ADC converter, rather than relying on the call to analogRead(). This would give a faster esponse and a wider bandwidth.

Wednesday 12 March 2014

The EU, what you need to know

I am a strong supporter of the EU and believe UK should be a totally involved member. There are currently 28 nations in the EU which is an economic and political partnership. The EU is based on treaties that UK has signed, with some "opt out" clauses.

Boarders have been removed between EU states and people can travel freely though out most of the continent - EXCEPT UK as we are not signed up to this agreement, so you have to show your passport when you come in! This EU freedom however makes it easy for anyone to live and work anywhere in the EU.

The EU has a single "internal market" for goods, services, money and people to move freely - EXCEPT UK where there are restrictions and some people want to have more limits.

The EU promotes human rights, and at least here the UK is signed up, although there are many voices of dissent... Human rights means dignity, freedom, democracy, equality, rule of law and respect for human rights - all brought together in the "Charter of Human Rights" signed under the treaty of Lisbon 2009 - to which UK is a signatory.

How it works

The EU is NOT a federal state (like USA). It is sovereign nations that mutually agree things. We pool some of our sovereignty to gain collective strength and world influence. Decisions are made by the European Parliament, elected by EU citizens and the European Council of members of national governments. The "civil service" of the EU is the European Commission who propose directives to harmonise the states, which must then be agreed by the EP & EC.

The European Commission is much maligned in UK, they DO NOT make laws, anything they propose has to be approved by the democratically elected EP & EC/C of ministers.

Download this book free from here.

Screen Shot 2014 03 12 at 12 10 39

These are the EU organisations - quite a lot of them, and we NEED to understand what they do!

Screen Shot 2014 03 12 at 12 12 02

I will not go into every one here, but the key ones are the EP - your voice, the EC & C your governments voices, and the EC - defining political directions. In addition there are the legal side, the C of J, the financial side, the ECB, and a bunch of others.

Decisions are made by

1 The European Parliament. That's why the elections in May 2014 are VERY important, we need to send our best people to the EP. (in my opinion we should not have to elect separate MPs and MEPs, but simply send some of our MP to Europe!!! Having separate MPs just causes power struggles)

The EP consists of:

Screen Shot 2014 03 12 at 12 30 20

Grouped by politics like this:

Screen Shot 2014 03 12 at 12 30 39

2. The European Council (headed by Van Rompuy, to be replaced this year...). All of our heads of state - i.e. Mr Cameron etc - determining political direction and priorities.

3. The Council. Government representatives. Day to day negotiations.

4. The European Commission (headed by Jose Manuel Borroso, to be replaced this year). Representing the EU as a whole, and keeping things harmonised and on track, proposing new laws. They do NOT adopt the laws, 1 & 3 do.

The law making process works like this:

Screen Shot 2014 03 12 at 12 21 48

Key points are

1. Laws (regulations, directives, decisions or recommendations) are drafted under provisions of treaties, and the form of words comes from the EC.

2. The EP amends these.

3. The Council (of our governments members) also approves

Or it all goes round and round until agreement is reached. Agreement can be in two ways: unanimous vote required or what is called "qualified majority" which means by most governments. Our UK parliament gets the proposed laws in draft form for debate before decisions to support or ask for changes.


You can have your say!!! If 1 million EU citizens from 1/4 of states agree then they can bring forward a law for the EC to consider. Need to get going on Facebook!!!

The euro (lower case please).

The euro has been a mess, mostly because the states that adopted it did NOT follow the rules. Almost every euro state broke the fundamental rules that would have stabilised the currency. And the banks dived in to promote this law breaking for their own profit ends. So the result is a great imbalance and great debts for some countries. These guys use the euro:

Screen Shot 2014 03 12 at 12 36 24

There is also quite a lot of corruption in the EU and billions of euro go missing every year. No one seems to be doing very much about this, as it is in every government's interest to get the money!

There is an EU Investment Bank (AAA rated) which sells bonds and invests in EU projects - to the tune of €52bn in 2012, €45 of which was spent in EU countries. This provide money for local small businesses and major development projects (like HS2...).

Screen Shot 2014 03 12 at 12 40 52

If you want to know more about the EU look here.

The Arduino Manager

One of the unsolved issues for me has been how to get my iMac to talk to the Arduino applications (or as they are called Sketches). The Arduino IDE (integrated Development Environment) has a "Serial Monitor" that allows you to give simple commands like Serial.begin(9600); followed by things like Serial.print("this and this"); to send information from the sketch to the iMac, and key presses on the iMac can be sent to the sketch. This is at least an interesting way to exchange commands and information. (I have used it is my Morse Code sender earlier in this blog).

But wouldn't it be nice to have a graphical interface with various elements available to communicate back and forward? Well there is a new one around called "Arduino Manager". And it runs on the iMac, iPad and iPhone. It is able to communicate by USB, WiFi and Ethernet. For the last two you obviously need a WiFi or Ethernet board (it uses the official Arduino boards).

So what can it do?

1. Provide a customisable interface with a variety of elements - push buttons, switches, displays, graphs...

2. Run a "Code Generator" to help you build your sketch correctly by generating the fundamentally needed bits of software code.

Here's a simple example:

Screen Shot 2014 03 12 at 10 52 27
As you can see this example has three boxes configured with actions. The first is a Push Button and a displayed red button. When the button is clicked it activates a red LED connected to the Arduino for 1 second (a programmable time of course...). The second box contains a switch and a display circle. This can switch on or off another yellow LED, when the LED is on the circle will light up. The last is very interesting, it is a box which can display data coming from the Arduino, in this example a temperature sensor.

At bottom right is the connection box where you select the IP address (for WiFi or Ethernet) or the USB serial device for USB. Connect this first and take care, if you want to load or re-upload your sketch to the Arduino you MUST Quit Arduino Manager first to break its use of the USB connection and allow the Arduino IDE to use the line.

The Arduino for this simple demo is wired as follows:

DSC 0016

On the left is a TMS36 temperature sensor IC connected to A0, and on the right are the two red and yellow LEDS connected to D6 & D8 (the red will be activated by the Arduino Manager display's REDLED push button and the yellow by the YELLOWLED switch). Here is the code needed to run this application:

// Arduino Manager 2 x LED & temp sensor
// REDLED button, YELLOWLED switch on/off, TEMP display

#include "SD.h"
#include "IOSControllerSerial.h"

// connection pins
#define RLEDPIN 6
#define YLEDPIN 8
#define TEMPPIN A0

// init global variables
int yellowLed = LOW;
int redLed = LOW;
float temp;

// create USB serial controller to execute work, sync, out and in messages
IOSControllerSerial iosController(&doWork, &doSync,
&processIncomingMessages, &processOutgoingMessages);

void setup()
{
  Serial.begin(9600);
  
  pinMode(RLEDPIN, OUTPUT);
  pinMode(YLEDPIN, OUTPUT);
  
  digitalWrite(YLEDPIN, yellowLed); // Y led off
  digitalWrite(RLEDPIN, redLed); // R led off
}

// conventional loop just calls iosController loop, every 200ms
void loop()
{
  iosController.loop(200);
}

// execute commands
void doWork()
{
  temp = getVoltage(TEMPPIN); // read temp 0-5V
  temp = (temp - 0.5) * 100; // 10mV/deg 0.5V offset, x 100
  
  digitalWrite(YLEDPIN, yellowLed); // on/off yellow led
}

// sync commands depending on name
void doSync(char *name)
{ 
  if(strcmp(name, "YLEDPIN") == 0) // if yellow led name, send current status
  {
    iosController.writeMessage(name, digitalRead(YLEDPIN));
  }
}

// read incoming messages for name with val
void processIncomingMessages(char  *name, char *val)
{
  if(strcmp(name, "REDLED") == 0) // if name button pushed, so flash red
  {
    iosController.logLn("REDLED");
    iosController.temporaryDigitalWrite(RLEDPIN, HIGH, 1000);
  }
  
  if(strcmp(name, "YELLOWLED") == 0) // get yellow name led command
  {
    yellowLed = atoi(val);
  }
}

// send outgoing messages for name with value
void processOutgoingMessages()
{
  iosController.writeMessage("YELLOWLED", yellowLed); // status of yellow led
  iosController.writeMessage("TEMP", temp); // value of temperature
}

// read and compute temperature value
float getVoltage(int pin)
{
  return (analogRead(pin) * 0.004882814); // 0-1023 = 0-5V
}


As you can see the code creates an object called "iosController". This then has various functions like "iosController.writeMessage(name, data)" where "name" is the title of the box on the iMac display, and data is the value to send to the box display. Four fundamental functions run the show, "doSync()", "doWork()", processIncomingMessages()", and "processOutgoing Messages()". These work as you can see in the example above.

Programming the iMac display is very simple, just activate the "edit" mode, top right, then click on any box. This will display the list of actions you can program into the box.

Screen Shot 2014 03 12 at 11 25 05

Each action can be customised by Name, and display.

For full information see the developers web site here.

The Arduino Manager software is available for download from either the Mac App Store or the iOS App Store.

Thursday 6 March 2014

Snippet of code for LCD display of bar graph

I thought I would document this snippet of code which shows an elegant way to draw a line and bar chart. At the moment it draws a fixed bar chart of BARS (defined as 10) bars, with the heights in the array barht[], obviously these values can be dynamically changed by your application, for example by an FFT of an audio input to give a spectrum...

The bar spacing and bar width are calculated depending on the number of bars (n) passed to the barchart() display function.

There is currently no vertical scale but this could be added...

2014 03 06 10 55 41
Code

#include "U8glib.h"

// SPI SCK-EN, MOSI-RW & SS-CS
#define EN 13
#define RW 11
#define CS 10

// display set up, bar, line position L & R
#define BARWDTH 5
#define LINEY 50
#define LINEXL 4
#define LINEXR 124
#define BARS 10

U8GLIB_ST7920_128X64_1X lcd(EN, RW, CS); // serial use, PSB = GND


void setup()
{  
  lcd.begin(); // init display
  lcd.setRot180(); // flip screen
}

void loop()
{
  int barht[BARS] = {5, 10, 20, 30, 40, 30, 20, 10, 5, 3}; // ht of the BARS bars
  
  // ... other code
  
  
  barchart(BARS, barht); // draw HT bars display
}

// plot line and bar at position and height
void barchart(int n, int bh[])
{
  int i, s, w; // bars, spacing and width
  
  s = (LINEXR - LINEXL) / n;
  w = s / 2;
  
  lcd.firstPage();
  do
  {
    lcd.drawLine(LINEXL, LINEY, LINEXR, LINEY);
    
    for(i = 0; i < n; i++)
    {
      lcd.drawBox(LINEXL + s * i, LINEY - bh[i], w, bh[i]);
    }
      
  }while(lcd.nextPage()); 
}


I just discovered that the lcd.drawBox(...) function gets mighty confused if the last term is 0 (zero). So any implementation should make sure that is is at least 1.